Flying Start
Every chapter in this book comes with working code examples — real Z80 assembly projects you can load straight into Klive IDE and run. All of them are bundled into a single archive: download next-examples.zip, unzip it somewhere convenient, and you’ll have the full set of sample projects ready to open.
Each subfolder in the archive corresponds to a chapter. You don’t need all of them right now — we’ll point to the relevant project at the start of each section. For the moment, just have the archive unpacked and Klive IDE installed, and you’re ready to go.
Using Klive IDE with ZX Spectrum Next Development
Throughout this book, you’ll build, run, and debug all the code examples using Klive IDE — an open-source emulator and development environment for ZX Spectrum machines, including the ZX Spectrum Next.
Two Windows, One Workflow
Klive runs as two separate windows: an Emulator window and an IDE window. The emulator is where your code actually runs — you see the ZX Spectrum Next screen, hear the audio, and interact with the machine. The IDE window is where you write code, manage projects, set breakpoints, inspect memory, and trigger builds.
Having two independent windows is no accident. If you have a dual-monitor setup, put the emulator on one screen and the IDE on the other. You get to watch your code run while you write it — which turns out to be a pretty satisfying development experience.
Klive saves window positions when you exit the app, so your dual-monitor layout is automatically restored on next launch.
The first time you start Klive, only the Emulator window opens. Use View | Show IDE to bring up the IDE window alongside it.
What We’ll Use It For
Every code example in this book lives in a Klive project — a folder with a klive.project file that tells the IDE which machine to target, which file to compile, and how to inject the built code into the emulator. You create a new project with File | New project, pick the ZX Spectrum Next as the machine type, choose a template, and the IDE sets everything up.
From there, the typical loop is:
- Write (or edit) your Z80 assembly source in the IDE editor
- Use the Build | Run menu command to build and inject the code into the running emulator
- Set breakpoints if needed, and use the Build | Debug command to step through it
All the machine control commands — start, pause, stop, step into, step over — are available from both windows, so you can drive the debug session from whichever screen you’re looking at.
Finding Your Way Around the Documentation
The complete Klive IDE documentation lives at https://dotneteer.github.io/kliveide/. Here are the sections most relevant to getting up and running:
- Installing Klive — install kits for Windows, macOS, and Linux
- Running Klive for the first time — starting the emulator, opening the IDE window, controlling the machine
- Creating a Klive project — project structure, build roots, and project templates
- Running and debugging code — the full toolbar and debug command reference
You don’t need to read all of that before continuing — we’ll introduce the relevant features as we need them. But if something in the IDE looks unfamiliar, those pages are a good first stop.
Running the Examples
The downloaded zip file (again, you can download it from here) is a single folder, book. After starting Klive, use the File | Open Folder command and select the unzipped book folder to open. It will show up the IDE window with the Klive Explorer displaying the book’s project structure.
The main file is in the folder’s root, it’s main.kz80.asm. As it is obvious, the .asm extension refers to the fact that this file contains code written in assembly. The .kz80 marker before the extension indicates that the code uses the Klive Z80 assembly dialect (the IDE’s own Z80 compiler language). In the Project Explorer, you see a small greenish icon to the right of the main file. This icon indicates that this file is the build root. When you issue any command from the menu or the interactive command window that requires compilation, this file is considered the the one to compile — of course, it may include other source files.
You can start the examples with the Build | Run menu command. Try it! This command kicks off a short sequence of steps (we’ll cover the details shortly) and then runs the example. The initial example displays a little message.
How Examples work in Klive
When you start an example, the IDE executes several steps:
- It compiles the source code starting from the build root.
- If the compilation is successful, the IDE exports it to a NEX (
.nex) file and stores that file in the_klivefolder of the emulator’s virtual SD card. - The IDE starts (or restarts) the ZX Spectrum Next machine.
- When the machine reaches its main execution loop, the IDE emulates the necessary keystokes to start the command line prompt. Then, the it emulates the keypresses to start the exported app file (
.nex) - The app starts.
All apps (save for a few exceptions) stop when they end and ask you to stop the machine. You can do that with the Machine | Stop menu command, or with the red square button in the toolbar. When you stop the machine, it resets to its initial state, so you can start another example without needing to restart Klive itself.
If you don’t stop it, the next Build | Run command restarts the machine for you, so you can keep going without worrying about it.
Throughout this book, every hands-on exercise loads and runs code using the NEX file format. It’s the standard way to distribute ZX Spectrum Next applications - a single file that contains everything needed to load and run a program. Understanding NEX files isn’t just academic curiosity; it’s essential for testing your emulator, running examples, and eventually creating your own Next software.
You can find a detailed breakdown of the NEX file format in Appendix A. It’s worth reading later — it’s not just a reference for the NEX format, but also a deep dive into how the Next’s memory and loading process works.
For now, just know that when you build and run the examples, Klive is creating a NEX file behind the scenes and loading it into the emulator for you.
The main.kz80.asm file
This file sets up the entire infrastructure for running the examples as a NEX file. The file’s code follows this blueprint:
.model next
.savenex file "nbook.nex"
.savenex core "3.1.0"
.savenex stackaddr STACK_TOP

; Unbanked code in bank 2 at $8000
    jp Main

; Use the utility methods
#include "_helpers/display.asm"
// ... other helpers

; Include the examples
#include "01_intro/print.asm"
#include "02_nextreg/write.asm"
// ... other examples

; We keep 256 bytes for the stack
STACK
    .defs $100
STACK_TOP

; The start of the example
Main
    call _clearScreen
    ; ...

;
; Here are the examples. Uncomment the one you want to run
    call PrintWelcome
    // call PrintValues
    // call WiteNextReg1
    // ... other examples

; When the example ends, we keep in infinite loop.
; You can reset or restart the machine.
trap
    ei
    call _waitForExit
    // ... Other cleanup code
    jp $
The .model and .savenex pragmas configure the project for the IDE. They export a NEX file named nbook.nex, targeting the ZX Spectrum Next machine with the 3.1.0 core. The stack is set to start at STACK_TOP, which is defined later in the file.
The main code starts at bank 2, address $8000, with a jump to the Main label. The Main procedure is where the example code runs. Between the initial jump and the Main procedure, we include some helper files that contain utility functions (like _clearScreen) that the examples can call. We also include the source files for each example, but they are not called by default — you need to uncomment the one you want to run.
The app starts by clearing the screen, then calls the example procedures (you can uncomment the one you want to run). When the example finishes, it enters an infinite loop, effectively halting the machine until you reset or restart it.
The helper routines start with an underscore (_) to distinguish them from the example code. You can look at their source in the _helpers folder to see how they work, and you can call them from your own code as well. The code uses macros and example routines with names starting with an uppercase letter, so you can easily tell them apart from the helpers. When you browse the code, you can easily recognize macro invocations: they are displayed with italic.
Printing to the Screen
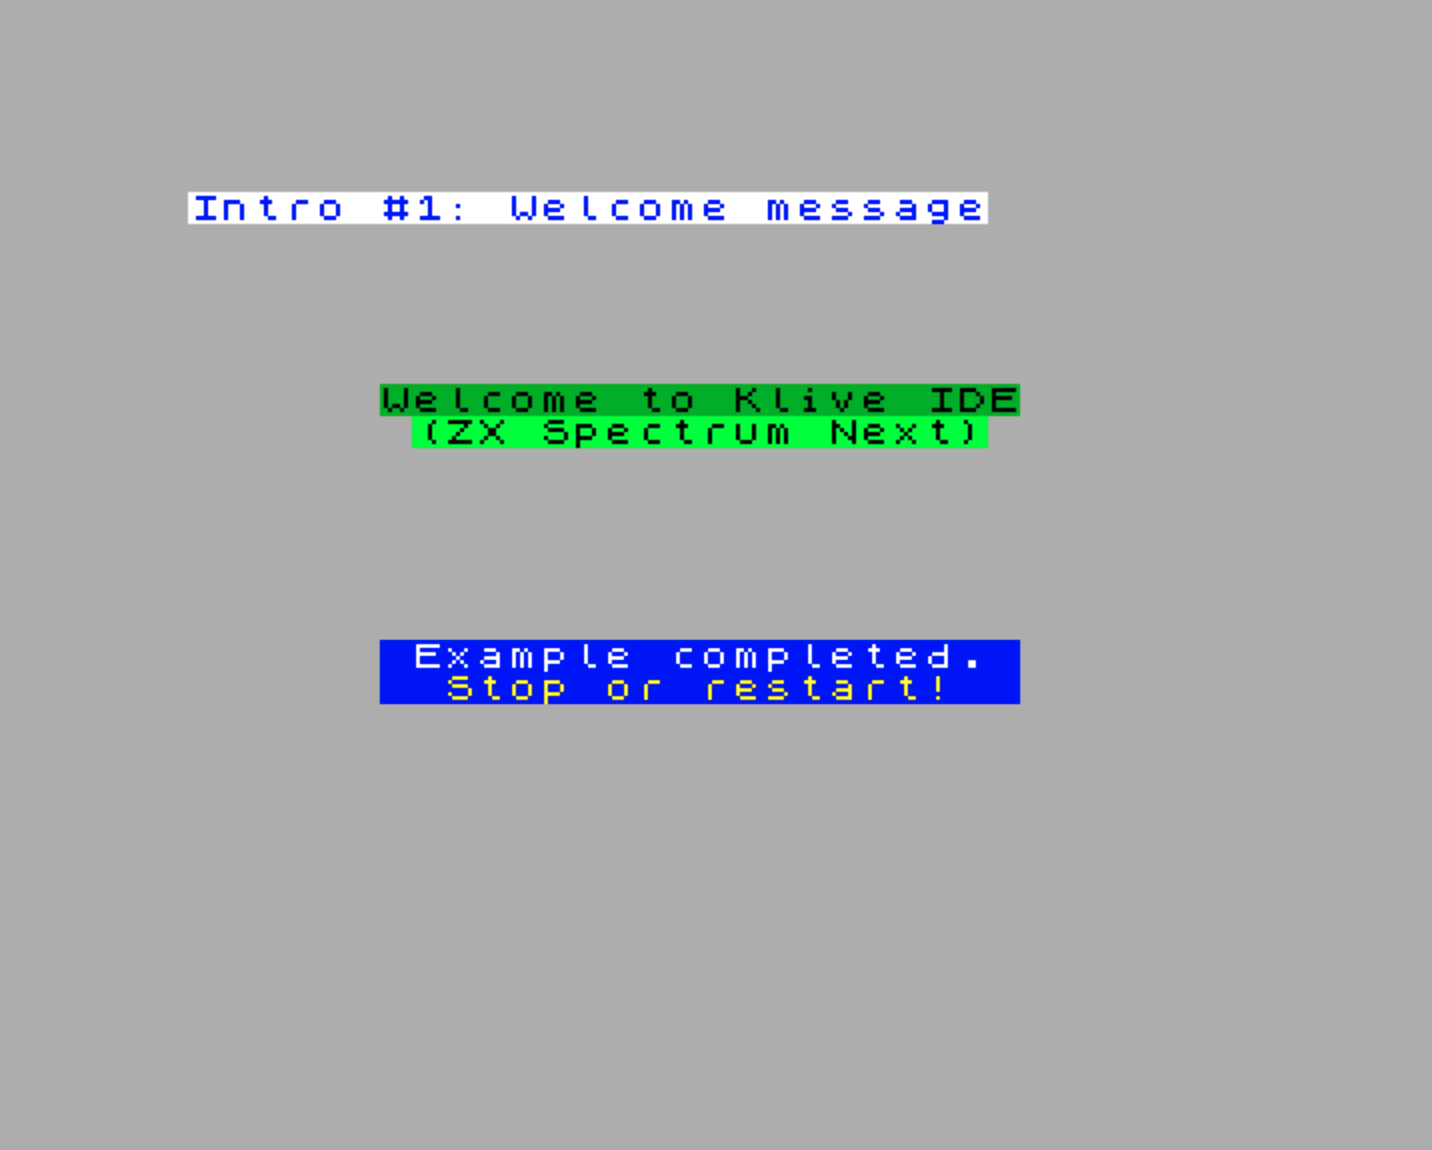
The PrintWelcome subroutine is the first example you see when you run the project. It demonstrates how to print text to the screen using a helper routine. It’s a good starting point for understanding how to output text on the Next.
Click and move the caret to the PrintWelcome token in the call PrintWelcome line in the Main procedure, and press F12 (or Ctrl+Click on Windows, Cmd+Click on macOS) to jump to its definition.
This will take you to the print.asm file in the 01_intro folder, where you can see how the PrintWelcome routine is implemented:
;==========================================================
; Example: Print welcome text to the screen
;==========================================================
PrintWelcome
    ld hl,Title_Intro_1
    call _printTitle
    ld hl,Welcome_Str
    jp _printText

Title_Intro_1
    .defn "Intro #1: Welcome message"
Welcome_Str
    .dm "\a\x06\x06" ; AT 6, 6
    .dm "\p\x04"     ; PAPER 4
    .dm "Welcome to Klive IDE"
    .dm "\a\x07\x07" ; AT 7, 7
    .dm "\p\x04"     ; PAPER 4
    .dm "\b\x01"     ; BRIGH 1
    .defn "(ZX Spectrum Next)"
The two helper routines, _printTitle and _printText, use zero-terminated strings as their input. The PrintWelcome routine loads the address of the title string into HL and calls _printTitle, then loads the address of the welcome message string and jumps to _printText. The title and welcome message strings are defined as zero-terminated data blocks using .dm directives. The .defn directive emits an additional 0x00 byte to terminate the string.
You can see some escape characters in the string definitions, like \a, \p, and \b. These are custom escape sequences defined by Klive’s assembler to represent ZX Spectrum Next-specific commands. For example, \a is used for the AT command to position the cursor, \p is for the PAPER command to set the background color, and \b is for the BRIGH command to set brightness. You can find a full list of these custom escapes in the Characters and Strings section of the documentation.
The _printText Helper
This routine is a simple text printer that takes a zero-terminated string and prints it to the screen. This routine uses the RST $10 instruction to call the Next’s built-in ROM routine for printing characters. The string can include custom escape sequences (like \a, \p, etc.) that the printer recognizes and executes as commands. Because several escape sequences may use the binary zero value as a parameter (e.g., \p\x00 to set PAPER 0), the _printText routine recognizes these and handles them correctly — it never treats a zero argument byte as the string terminator:
; ------------------------------------------------------------------------------
; Prints the specified text to the screen. The text should be
; terminated with 0. The bytes following control characters such as
; PAPER, INK, AT, etc. can be zeros; they do not terminate the text.
; IN:
;   HL=Start of the text (zero-terminated)
; OUT:
;   ..BCDE../IX same
;   AF....HL/.. different
; ------------------------------------------------------------------------------
_printText
    ld a,(hl)                   ; Read the current character
    and a                       ; Check for terminating zero
    ret z                       ; Terminator found, done.

    ; Check for characters with argument bytes
    cp $10                      ; $00-$0f
    jr c,`singleChar            ; Print the character
    cp $17                      ; TAB or higher
    jr nc,`singleChar           ; Print the character
    cp $16                      ; Anything but AT
    jr nz,`oneArg
    rst $10                     ; Print AT
    inc hl
    ld a,(hl)                   ; Get the next argument byte
`oneArg
    rst $10                     ; Print the character/argument byte
    inc hl
    ld a,(hl)                   ; Get the next argument byte
`singleChar
    rst $10                     ; Print the character
    inc hl
jr _printText ; Continue the printing loopLabels starting with the backtick character (`) are local labels in Klive’s assembler. They are only visible within the scope of the current procedure and cannot be referenced from outside. This allows you to use simple names for internal jumps without worrying about name collisions with other procedures or global labels.
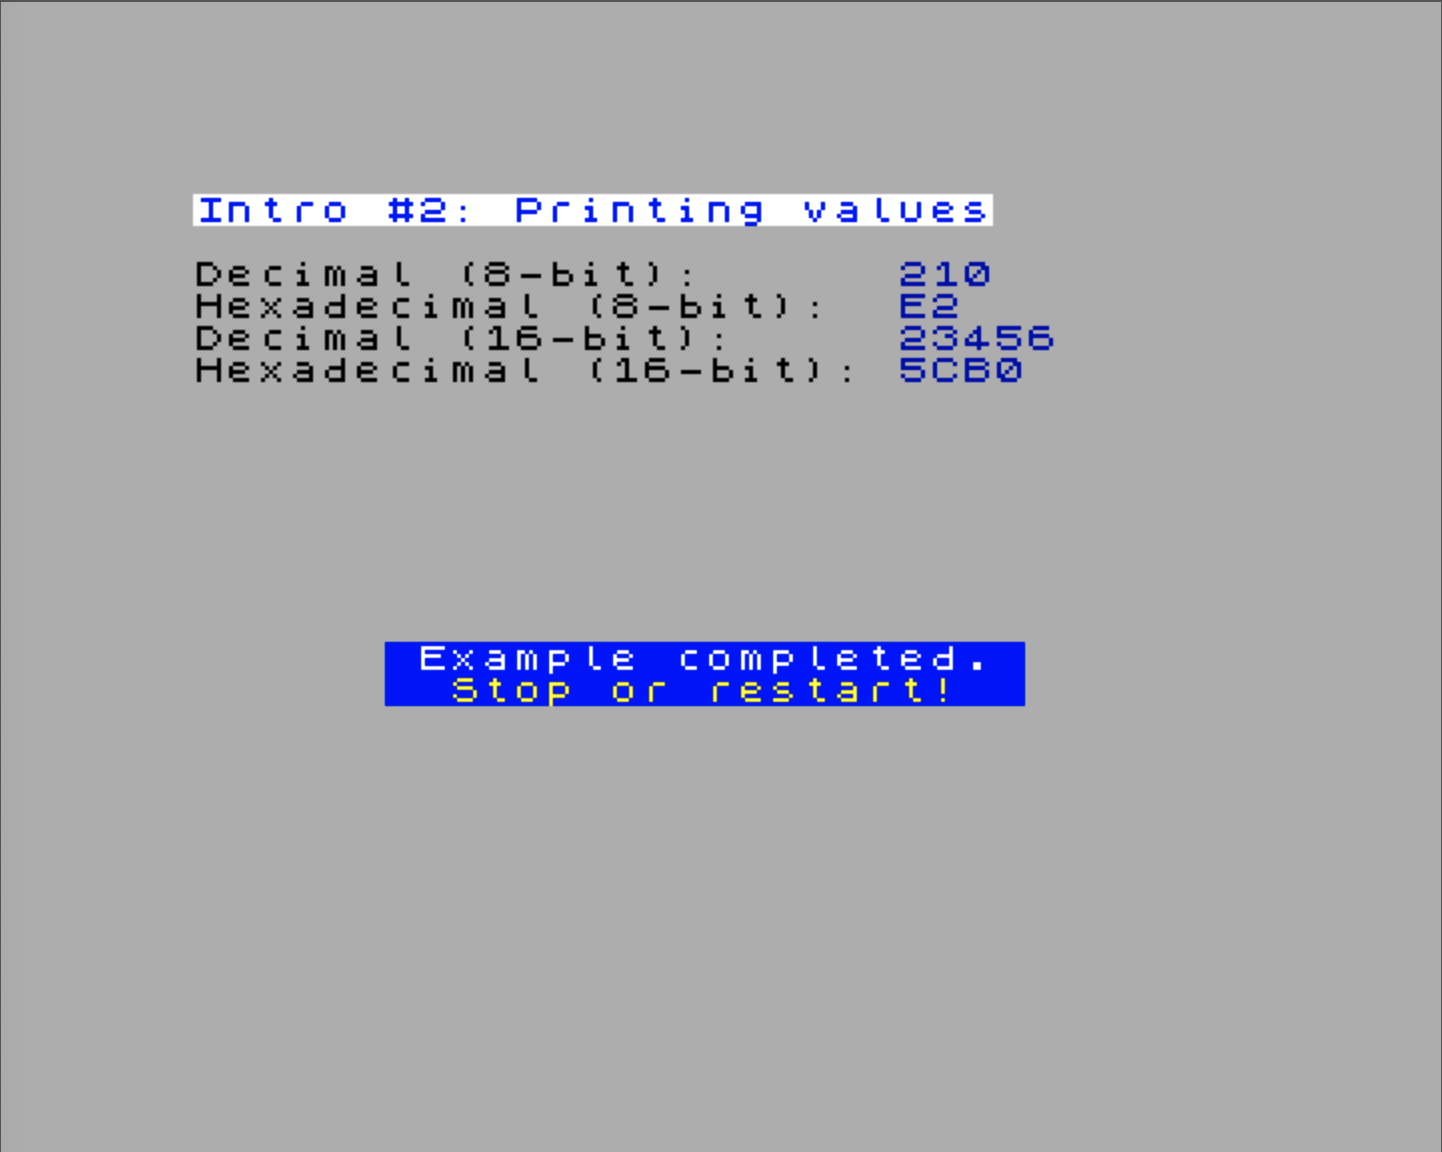
Printing Decimal and Hexadecimal Values
The second example, PrintValues, demonstrates how to print numeric values in both decimal and hexadecimal formats. You can try it: comment out the call PrintWelcome line in the Main procedure, and uncomment the call PrintValues line. Then, run the project again to see the output.
This example uses several helper routines to convert binary values into their string representations and print them to the screen.
;==========================================================
; Example: Print decimal and hexadecimal numbers to the
; screen
;==========================================================
PrintValues
    ld hl,Title_Intro_2
    call _printTitle
    ;
    ; Print decimal and hexadecimal values
    ;
    ld hl,Decimal8_Str
    call _printText
    ld a,210
    push af
    Ink(COLOR_BLUE)
    call _printADecimal
    NewLine()
    Ink(COLOR_BLACK)
    ld hl,Hexadecimal8_Str
    call _printText
    Ink(COLOR_BLUE)
    pop af
    call _printAHexadecimal
    Ink(COLOR_BLACK)
    NewLine()
    ld hl,Decimal16_Str
    call _printText
    Ink(COLOR_BLUE)
    ld hl,23456
    push hl
    call _printHLDecimal
    NewLine()
    Ink(COLOR_BLACK)
    ld hl,Hexadecimal16_Str
    call _printText
    Ink(COLOR_BLUE)
    pop hl
    jp _printHLHexadecimal

Title_Intro_2
    .defn "Intro #2: Printing values"
Decimal8_Str
    .defn "Decimal (8-bit):      "
Hexadecimal8_Str
    .defn "Hexadecimal (8-bit):  "
Decimal16_Str
    .defn "Decimal (16-bit):     "
Hexadecimal16_Str
    .defn "Hexadecimal (16-bit): "
Visit the declaration of helper routines like _printADecimal, _printAHexadecimal, _printHLDecimal, and _printHLHexadecimal to see how they convert binary values into their string representations and print them using the _printText routine.
In the source code, you may see some macro invocations like Ink(COLOR_BLUE) and NewLine(). These are defined in the helper files and expand into sequences of assembly instructions. For example, Ink(COLOR_BLUE) might expand to a sequence that sets the INK color to blue using the appropriate escape sequence. You can look at the macro definitions in the helper files to see exactly what code they generate.
When you hover the mouse over a macro invocation in the IDE, a tooltip appears showing the macro’s body with parameter placeholders. This allows you to understand what code the macro will emit without needing to navigate to its definition.