In the previous posts, you created an empty Visual Studio Package that did not do add any useful functionality to the IDE, except showing up its identity in the Help | About dialog. In this post, you will learn a few more details about VSPackages.
We are going to create a package that displays a simple greeting message in the Output tool window. Let’s start with creating a new package—similarly, as we did in the previous posts. This time we name the project GreeterPackage. Here is a short recap of the steps to start the project:
1. Start a new Visual Studio project. In the New Project dialog, select the Extensibility template category under Visual C# | Windows, and then choose the VSIX Project template.
2. After the IDE has created the project, in Solution Explorer, right-click the GreeterPackage project node, and add a Visual Studio Package item (GreeterPackage.cs) with the Add New Item command.
Adding an Action to Initialize
Visual Studio has a frequently used tool window, the Output window that you can display with the View | Output command. This window has several panes; each contains log messages from specific sources. Change the constructor and the Initialize method of GreeterPackage to write a simple log message to the General pane:
[PackageRegistration(UseManagedResourcesOnly = true)]
[InstalledProductRegistration("#110", "#112", "1.0", IconResourceID = 400)]
[Guid(PackageGuidString)]
public sealed class GreeterPackage : Package
{
    public const string PackageGuidString = "bd73baa0-080b-4469-bb5b-eb4633e183b7";

    private readonly string _greeting;

    public GreeterPackage()
    {
        _greeting = $"Hello from GreeterPackage ({DateTime.Now})\n";
    }

    protected override void Initialize()
    {
        base.Initialize();

        var outputWindow = GetService(typeof(SVsOutputWindow)) as IVsOutputWindow;
        if (outputWindow == null) return;

        var outputPaneId = VSConstants.OutputWindowPaneGuid.GeneralPane_guid;
        var hresult = outputWindow.CreatePane(outputPaneId, "General", 1, 0);
        ErrorHandler.ThrowOnFailure(hresult);

        IVsOutputWindowPane windowPane;
        hresult = outputWindow.GetPane(outputPaneId, out windowPane);
        ErrorHandler.ThrowOnFailure(hresult);

        windowPane.Activate();
        windowPane.OutputString(_greeting);
    }
}
This code does a cheap initialization in its constructor—it sets up the _greeting member with a log message that includes the current timestamp. The real work is done in the overridden Initialize method. Here, the code invokes the Initialize method of the base class and then goes on with the package-specific initialization. I will treat soon what the code does, but first, let me tell you the importance of splitting the initialization code between the package constructor and Initialize.
Package Siting
When the constructor of GreetingPackage has been executed, the package instance is just an object in the process memory, and it does not hold any reference to any object that accesses the Visual Studio shell. However, the IDE has a reference to the GreetingPackage instance. After creating the package, the Visual Studio Shell sites the package. As a part of the siting process, the shell invokes the Initialize method. Initialize is a virtual method, and invoking the base class’s Initialize method consummates the siting. Now, GreetingPackage has access to the shell and other packages.
Note: In reality, each Visual Studio Package implements the IVsPackage interface. The Managed Package Framework provides the Package base class (declared in the Microsoft.VisualStudio.Shell namespace), which simplifies the siting with Initialize.
The code utilizes the GetService method to access the Visual Studio shell:
var outputWindow = GetService(typeof(SVsOutputWindow)) as IVsOutputWindow;
Observe, it is the Service Locator pattern. By invoking GetService, you get an object from the shell to carry out a particular task. Here, the service obtained through the SVsOutputWindow type allows you to access an IVsOutputWindow-aware object instance to manage the Output window.
When you moved the GetService call into the constructor, the package load would fail, because at that moment the package would not be sited yet, and GetService could not retrieve the expected service object.
Note: Should you omit the base.Initialize() call, the package would still work, but a part of the initialization would not be carried out.
Loading the Package
When you run the package with Ctrl+F5 (with the Build | Start Without Debugging command), you do not find any message in the Output window. Moreover, as Figure 1 shows, you may not find the General pane.
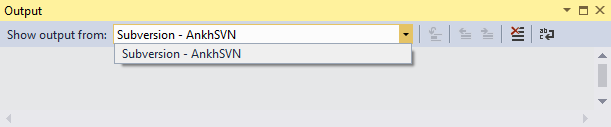
Figure 1: The Output window—No General pane
What has happened?
The right question is: what has not happened? You cannot find the expected message because the GreetingPackage has not been loaded into the shell. Even if you can see the package in the Help | About dialog (Figure 2), it has not been loaded yet into the memory.
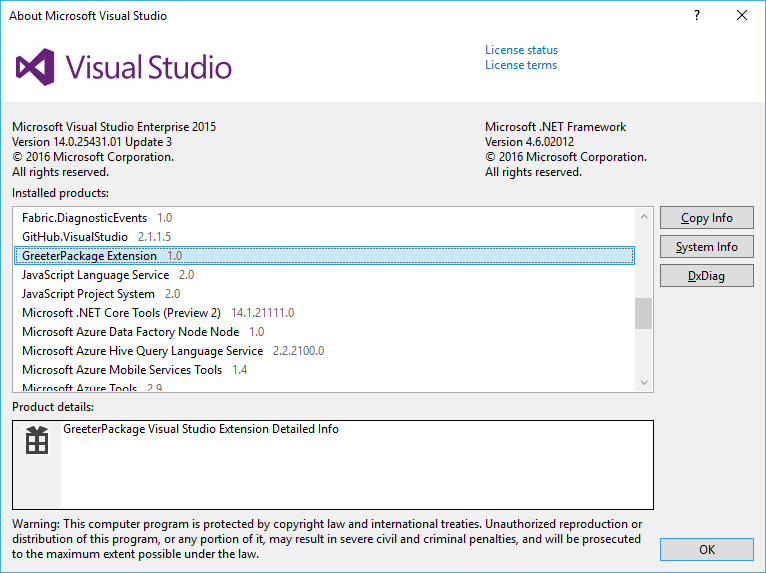
Figure 2: GreeterPackage in the About dialog
Visual Studio loads packages on demand—the first time when it is needed. GreetingPackage has no operations to interact with, so we cannot implicitly trigger the loading of the package by invoking one of its operations.
Instead, we can declare a UI context that determines when the package should be loaded. Modify the decorations of GreeterPackage with the ProvideAutoLoad attribute:
[PackageRegistration(UseManagedResourcesOnly = true)]
[InstalledProductRegistration("#110", "#112", "1.0", IconResourceID = 400)]
[ProvideAutoLoad(VSConstants.UICONTEXT.NoSolution_string)]
[Guid(PackageGuidString)]
public sealed class GreeterPackage : Package
{
    // ...
}
This attribute tells the shell that the package should be automatically loaded when the shell observes that no solution is currently loaded. When you start Visual Studio, it enters into this UI context. Thus, as a result of the ProvideAutoLoad attribute, GreeterPackage is automatically loaded whenever you launch the IDE. Now, the message we expect shows up in the General pane of the Output window (Figure 3).
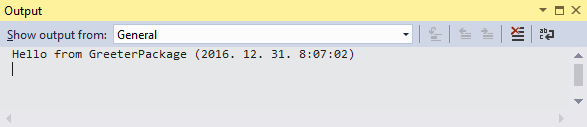
Figure 3: The message in the Output window
Writing to the Output Window
Now, it is time to take a look at the Output window handling details. Here is the code that outputs the _greeting class member’s content to the General pane:
var outputWindow = GetService(typeof(SVsOutputWindow)) as IVsOutputWindow;
if (outputWindow == null) return;

var outputPaneId = VSConstants.OutputWindowPaneGuid.GeneralPane_guid;
var hresult = outputWindow.CreatePane(outputPaneId, "General", 1, 0);
ErrorHandler.ThrowOnFailure(hresult);

IVsOutputWindowPane windowPane;
hresult = outputWindow.GetPane(outputPaneId, out windowPane);
ErrorHandler.ThrowOnFailure(hresult);

windowPane.Activate();
windowPane.OutputString(_greeting);
As I already mentioned, you can utilize the SVsOutputWindow service to access the Output window management operations. The retrieved service object implements the IVsOutputWindow interface. Window panes—just as any objects within the shell—have GUID identifiers. The corresponding Output window IDs are accessible through the OutputWindowPaneGuid property of VSConstants.
Before writing to a pane, we must ensure that the pane exists. Thus we invoke CreatePane passing its ID, its caption, and two flags. The first flag tells whether the pane should be visible or hidden, the second determines whether its content should be cleared when closing the currently loaded solution.
To write to the pane, we must obtain a reference to it (with GetPane), which happens to be an IVSOutputWindowPane-aware object. With Activate we take care to display the corresponding pane, then we write the message with OutputString.
A part of this code looks weird—especially if you are a young developer grown up on .NET and C#. The Visual Studio shell uses the COM programming model heavily. There are partitions of that programming model that are covered by the Managed Package Framework—and so you can use them with the .NET programming style—, but a significant portion of available services can be handled only with the good old COM approach. Here are a few things you can catch in the code above:
- COM methods always return a 32-bit integer (
HRESULT) value that indicates success or failure (with a bit more specific details on what was the reason for the failure). - The
ThrowOnFailuremethod helps aborting the current operation when something fails. As its name suggests, this method signs failures with throwing exceptions. - Instead of Boolean flags, integer values are used with the C semantics: zero means false, all other values produce true.
Note: With every release of the Visual Studio SDK, more and more of the COM functionality as wrapped into managed objects. Nonetheless, still a substantial portion of the service operations do not have their managed pairs.
The Experimental Instance
So far, I did not spend too much time with explaining what the Visual Studio Experimental Instance is. Because developing VSPackages requires getting acquainted with this concept, here I give you an overview about it.
Visual Studio Experimental Instance is a test bed to run and debug Visual Studio packages — and other kinds of extensions — during the development and test phase. It is not a new installation of Visual Studio—it is the same devenv.exe file you use usually. But why you need it?
As I mentioned earlier, a VSPackage is registered—information is written into the system registry —to integrate the package with Visual Studio. Every time you build and run a package, some information goes into the registry. When you modify the package, it might also affect the information in the registry. Can you imagine the confusion it can lead when you always modified the registry under the Visual Studio instance you are using to develop and debug a package? What if your package does not work or even worse: it prevents Visual Studio start correctly or even causes a crash? How would you fix the pollution of the registry?
This is the point when Visual Studio Experimental Instance comes into the picture. The Experimental Instance is simply another instance of Visual Studio that picks up its settings from a different place—including configuration files and registry keys.
The devenv.exe program keeps its configuration settings in the system registry in the CURRENT_USER hive under the Software\Microsoft\VisualStudio\14.0_Config key (Visual Studio 2015). When Visual Studio runs, it reads out the configuration information from these keys by default. With the /rootsuffix command line parameters, the root key used by devenv.exe can be changed.
The VSIX Project template sets up the package project so that devenv.exe uses the /rootsuffix Exp command line parameter when running or debugging the package (Figure 4).
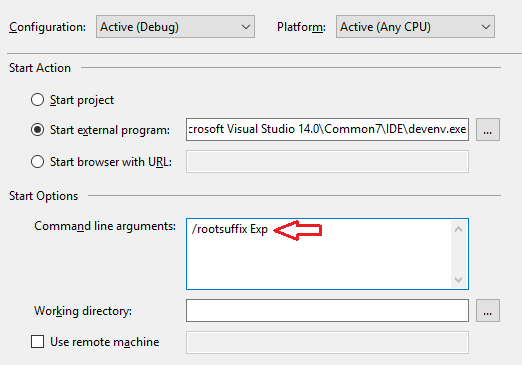
Figure 4: Debug settings of a VSIX Project
Thus, devenv.exe will use the Software\Microsoft\VisualStudio\14.0Exp_Config registry key under the CURRENT_USER registry hive whenever you run the package with the F5 (Build | Start Debugging) or Ctrl+F5 (Build | Start Without Debugging) commands. A VSIX Project will launch the Visual Studio Experimental Instance using this registry key.
The build process of a package copies the package binaries and the VSIX manifest information to a well-known location under the current user’s application data folder. When the Experimental Instance starts, it discovers the package in that folder and utilizes the information found there to enter the package information into the registry key consumed by the Experimental Instance.
Using the Experimental Instance prevents you from polluting the registry of the Visual Studio instance used for the standard development process. However, making mistakes, recompilations, and faulty package registrations does not prevent you from putting junk or leaving orphaned information in the Experimental Instance registry. Making an appropriate cleanup could be very complicated and dangerous if you would do it by delving in the registry.
Debugging the Package
Without the opportunity to debug a VSPackage, development would not be easy. Fortunately, you have the same debug experience with packages as with other types of .NET apps. When you start a VSIX project with F5, the debugger attaches itself to the Experimental Instance process and lets you utilize your preferred debugging techniques. Figure 5 shows that the debugger is stopped within the Initialize method of the package.
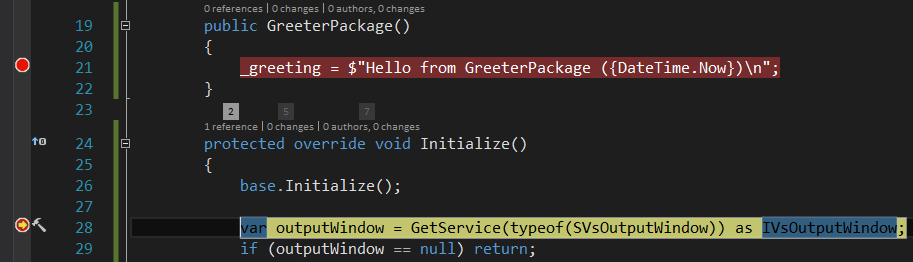
Figure 5: Debugging a VSPackage
Where We Are
In this post, you learned the way a package is sited within the IDE and understood the importance of the Initialize method. As you saw, the Visual Studio shell uses the COM-way to exploit its services. With the help of the Experimental Instance, you can run and debug your VSPackages in the development and test phase.
In the next article, you will learn about Visual Studio commands.