In the previous post, I showed you how easy is to add an options page to a VSPackage with the predefined (property grid) UI. Often, you need to add your custom UI instead of a property grid to provide a better user experience. For example, specifying a color with its textual name is not an excellent way, since you have names only for several dozen colors out of the 16 million available through RGB codes.
In this post, you will learn to create your custom options page UI. By default, you need to create Windows Forms custom controls to represent your page—thus, for the sake of simplicity, I will use this technology.
Instead of creating a new package, you carry on with the SimpleOptionsPagePackage sample you implemented in Part #6. First, you are going to create the custom UI to represent the same text settings that you applied in the previous post. Next, you will update the tool window to use the options page with the custom UI.
Creating the Options Page Class
Just as options pages with the default property grid UI, the ones that apply their custom UI derive from DialogPage. Create a new class, GreetingOptionsPage, and set up its properties similarly to GreetingsOptionsGrid:
using System.ComponentModel;
using System.Drawing;
using System.Windows.Forms;
using Microsoft.VisualStudio.Shell;

namespace SimpleOptionsPagesPackage
{
    public class GreetingsOptionsPage : DialogPage
    {
        [Category("Text settings")]
        [DisplayName("Font size")]
        [Description("Size of the greeting text")]
        public int TextSize { get; set; } = 32;

        [Category("Text settings")]
        [DisplayName("Color")]
        [Description("Color of the greeting text")]
        public Color TextColor { get; set; } = Color.Red;
    }
}
Observe, now the TextColor property is a Color (System.Windows.Forms), and not a string.
Create a new Windows Forms Custom Control (Figure 1) with the Add New Item command; name it GreetingsControl.
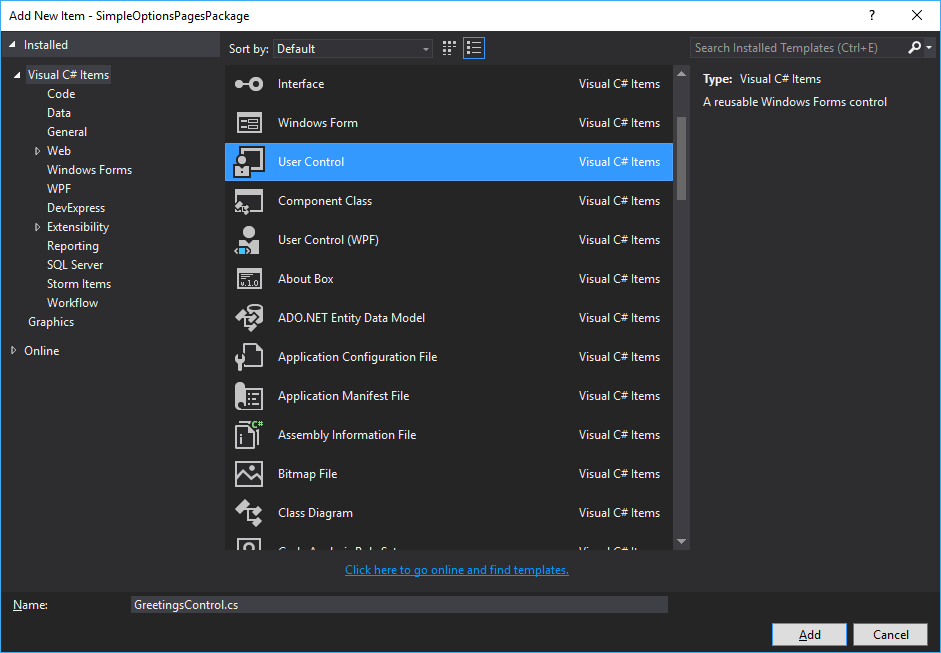
Figure 1: Add a new Windows Forms User Control to the project
Edit the UI so that I would look like in Figure 2.
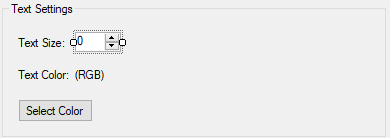
Figure 2: The UI of the custom options page
The custom control encapsulates three Label controls, a NumericUpDown, a Button, and a ColorDialog. If you are not familiar with editing Windows Forms Control, just copy this code into the GreetingsControl.Designer.cs file (a nested Solution Explorer node within GreetingsControl.cs):
namespace SimpleOptionsPagesPackage
{
    partial class GreetingsControl
    {
        /// <summary>
        /// Required designer variable.
        /// </summary>
        private System.ComponentModel.IContainer components = null;

        /// <summary>
        /// Clean up any resources being used.
        /// </summary>
        /// <param name="disposing">true if managed resources should be
        /// disposed; otherwise, false.
        /// </param>
        protected override void Dispose(bool disposing)
        {
            if (disposing && (components != null))
            {
                components.Dispose();
            }
            base.Dispose(disposing);
        }

        #region Component Designer generated code

        /// <summary>
        /// Required method for Designer support - do not modify
        /// the contents of this method with the code editor.
        /// </summary>
        private void InitializeComponent()
        {
            this.label1 = new System.Windows.Forms.Label();
            this.TextSizeBox = new System.Windows.Forms.NumericUpDown();
            this.label2 = new System.Windows.Forms.Label();
            this.RgbText = new System.Windows.Forms.Label();
            this.ColorDialog = new System.Windows.Forms.ColorDialog();
            this.SelectColorButton = new System.Windows.Forms.Button();
            this.groupBox1 = new System.Windows.Forms.GroupBox();
            ((System.ComponentModel.ISupportInitialize)(this.TextSizeBox)).BeginInit();
            this.groupBox1.SuspendLayout();
            this.SuspendLayout();
            //
            // label1
            //
            this.label1.AutoSize = true;
            this.label1.Location = new System.Drawing.Point(13, 34);
            this.label1.Name = "label1";
            this.label1.Size = new System.Drawing.Size(54, 13);
            this.label1.TabIndex = 0;
            this.label1.Text = "Text Size:";
            //
            // TextSizeBox
            //
            this.TextSizeBox.Location = new System.Drawing.Point(73, 30);
            this.TextSizeBox.Name = "TextSizeBox";
            this.TextSizeBox.Size = new System.Drawing.Size(46, 20);
            this.TextSizeBox.TabIndex = 1;
            this.TextSizeBox.ValueChanged +=
              new System.EventHandler(this.TextSizeBox_ValueChanged);
            //
            // label2
            //
            this.label2.AutoSize = true;
            this.label2.Location = new System.Drawing.Point(13, 66);
            this.label2.Name = "label2";
            this.label2.Size = new System.Drawing.Size(58, 13);
            this.label2.TabIndex = 2;
            this.label2.Text = "Text Color:";
            //
            // RgbText
            //
            this.RgbText.AutoSize = true;
            this.RgbText.Location = new System.Drawing.Point(70, 66);
            this.RgbText.Name = "RgbText";
            this.RgbText.Size = new System.Drawing.Size(36, 13);
            this.RgbText.TabIndex = 3;
            this.RgbText.Text = "(RGB)";
            //
            // SelectColorButton
            //
            this.SelectColorButton.Location = new System.Drawing.Point(16, 97);
            this.SelectColorButton.Name = "SelectColorButton";
            this.SelectColorButton.Size = new System.Drawing.Size(75, 23);
            this.SelectColorButton.TabIndex = 4;
            this.SelectColorButton.Text = "Select Color";
            this.SelectColorButton.UseVisualStyleBackColor = true;
            this.SelectColorButton.Click +=
              new System.EventHandler(this.SelectColorButton_Click);
            //
            // groupBox1
            //
            this.groupBox1.Controls.Add(this.SelectColorButton);
            this.groupBox1.Controls.Add(this.label1);
            this.groupBox1.Controls.Add(this.RgbText);
            this.groupBox1.Controls.Add(this.TextSizeBox);
            this.groupBox1.Controls.Add(this.label2);
            this.groupBox1.Location = new System.Drawing.Point(2, 2);
            this.groupBox1.Name = "groupBox1";
            this.groupBox1.Size = new System.Drawing.Size(384, 136);
            this.groupBox1.TabIndex = 5;
            this.groupBox1.TabStop = false;
            this.groupBox1.Text = "Text Settings";
            //
            // GreetingsControl
            //
            this.AutoScaleDimensions = new System.Drawing.SizeF(6F, 13F);
            this.AutoScaleMode = System.Windows.Forms.AutoScaleMode.Font;
            this.Controls.Add(this.groupBox1);
            this.Name = "GreetingsControl";
            this.Size = new System.Drawing.Size(390, 139);
            ((System.ComponentModel.ISupportInitialize)(this.TextSizeBox)).EndInit();
            this.groupBox1.ResumeLayout(false);
            this.groupBox1.PerformLayout();
            this.ResumeLayout(false);

        }

        #endregion

        private System.Windows.Forms.Label label1;
        private System.Windows.Forms.NumericUpDown TextSizeBox;
        private System.Windows.Forms.Label label2;
        private System.Windows.Forms.Label RgbText;
        private System.Windows.Forms.ColorDialog ColorDialog;
        private System.Windows.Forms.Button SelectColorButton;
        private System.Windows.Forms.GroupBox groupBox1;
    }
}
With the View Code (F7) command, you can define the code behind the custom control. Type the following code for the GreetingsControl class:
using System;
using System.Drawing;
using System.Windows.Forms;

namespace SimpleOptionsPagesPackage
{
    public partial class GreetingsControl : UserControl
    {
        private readonly GreetingsOptionsPage _hostPage;

        public GreetingsControl(GreetingsOptionsPage hostPage)
        {
            InitializeComponent();

            _hostPage = hostPage;
            TextSizeBox.Value = _hostPage.TextSize;
            RgbText.Text = RgbString(_hostPage.TextColor);
        }

        private void SelectColorButton_Click(object sender, EventArgs e)
        {
            if (ColorDialog.ShowDialog() != DialogResult.OK) return;

            var color = ColorDialog.Color;
            _hostPage.TextColor = color;
            RgbText.Text = RgbString(color);
        }

        private void TextSizeBox_ValueChanged(object sender, EventArgs e)
        {
            _hostPage.TextSize = (int)TextSizeBox.Value;
        }

        private string RgbString(Color color)
        {
            return $"({color.R}, {color.G}, {color.B})";
        }
    }
}
The constructor binds the user control to its hosting options page so that it can initialize it and later, as the user changes settings, the new option values can be set.
Binding the Custom UI with the Options Page
Now, you can add the new options page to OptionsPagesPackage with the same ProvideOptionPage attribute used in Part #6:
[PackageRegistration(UseManagedResourcesOnly = true)]
[InstalledProductRegistration("#110", "#112", "1.0", IconResourceID = 400)]
[Guid(PackageGuidString)]
[ProvideMenuResource("Menus.ctmenu", 1)]
[ProvideToolWindow(typeof(GreetingToolWindow))]
[ProvideOptionPage(typeof(GreetingsOptionsGrid), "Greetings Package",
  "Greetings Page", 0, 0, true)]
[ProvideOptionPage(typeof(GreetingsOptionsPage), "Greetings Package",
  "Greetings Page (Custom)", 0, 0, true)]
public sealed class OptionsPagesPackage : Package
{
    // ...
}
Now, the package has two options pages (Figure 3). Although you have already created a new custom UI, it is not associated yet with GreetingsOptionsPage, so the UI still displays a property grid.
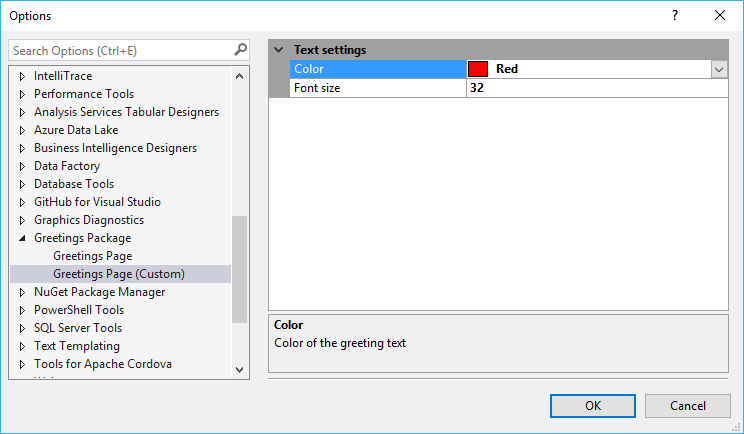
Figure 3: The new custom page—still with a property grid
To let the new UI appear in the Options dialog, override the Window property of GreetingsOptionsPage, as highlighted here:
public class GreetingsOptionsPage : DialogPage
{
    [Category("Text settings")]
    [DisplayName("Font size")]
    [Description("Size of the greeting text")]
    public int TextSize { get; set; } = 32;

    [Category("Text settings")]
    [DisplayName("Color")]
    [Description("Color of the greeting text")]
    public Color TextColor { get; set; } = Color.Red;

    protected override IWin32Window Window => new GreetingsControl(this);
}
The IWin32Windows interface (declared in the System.Windows.Forms namespace) represents an object that can return a window handle. By default, Window returns a handle to a user control that displays the property grid. By overriding it, we can provide a handle to a custom control instance, just as we do in this code. Evidently, we return a handle to the user control that represents the custom options page UI.
Note: You can host WPF User Controls in options pages, too, nonetheless it requires some additional hacking. See this article for more details.
When you run the package, the Experimental Instance shows the custom UI (Figure 4).
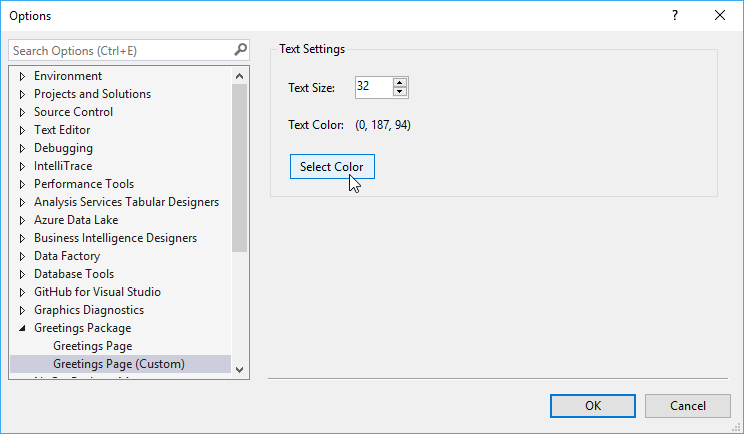
Figure 4: The options page with the custom UI
Updating the Tool Window
At the moment, we have two options pages, and the first is bound with GreetingToolWindow. Change the code of GreetingToolWindowControl to apply the settings in the new options page:
using System.Windows.Media;
using Color = System.Drawing.Color;
using WpfColor = System.Windows.Media.Color;

namespace SimpleOptionsPagesPackage
{
    using System.Windows.Controls;

    public partial class GreetingToolWindowControl : UserControl
    {
        private readonly GreetingToolWindow _toolWindow;

        public GreetingToolWindowControl(GreetingToolWindow toolWindow)
        {
            _toolWindow = toolWindow;
            InitializeComponent();
            Loaded += ToolWindowLoaded;
        }

        private void ToolWindowLoaded(object sender, System.Windows.RoutedEventArgs e)
        {
            var color = TextColor;
            var wpfColor = WpfColor.FromArgb(color.A, color.R, color.G, color.B);
            Welcome.Foreground = new SolidColorBrush(wpfColor);
            Welcome.FontSize = TextSize;
        }

        private OptionsPagesPackage Package => _toolWindow.Package as OptionsPagesPackage;

        private int TextSize => (Package?.GetDialogPage(typeof(GreetingsOptionsPage))
            as GreetingsOptionsPage)?.TextSize ?? 12;

        private Color TextColor => (Package?.GetDialogPage(typeof(GreetingsOptionsPage))
            as GreetingsOptionsPage)?.TextColor ?? Color.Red;
    }
}
As the highlighted changes show, we need to convert colors from Windows Forms (System.Drawing.Color) to WPF (System.Windows.Media). When you run the package, the welcome message text properties change according to the custom options page settings. Nonetheless, you should close and display the tool window again to let the changes be applied.
Observing Options Changes
Visual Studio does not provide a mechanism to notify you about options page property changes, so you need to implement your notification pattern. Nonetheless, you can apply your favorite method. One possible solution is—I would not say, it is the best—to add a static event to GreetingsOptionsPage:
using System;
using System.ComponentModel;
using System.Drawing;
using System.Windows.Forms;
using Microsoft.VisualStudio.Shell;

namespace SimpleOptionsPagesPackage
{
    public class GreetingsOptionsPage : DialogPage
    {
        private int _textSize = 32;
        private Color _textColor = Color.Red;

        [Category("Text settings")]
        [DisplayName("Font size")]
        [Description("Size of the greeting text")]
        public int TextSize
        {
            get { return _textSize; }
            set
            {
                _textSize = value;
                OnOptionsChanged();
            }
        }

        [Category("Text settings")]
        [DisplayName("Color")]
        [Description("Color of the greeting text")]
        public Color TextColor
        {
            get { return _textColor; }
            set
            {
                _textColor = value;
                OnOptionsChanged();
            }
        }

        protected override IWin32Window Window => new GreetingsControl(this);

        public static event EventHandler OptionsChanged;

        private static void OnOptionsChanged()
        {
            OptionsChanged?.Invoke(null, EventArgs.Empty);
        }
    }
}
Note: I do not prefer static classes and events because they may cause difficulties when unit testing. I’d rather use some lightweight messaging, such as the one in the MVVM Light Toolkit.
Now, in GreetingToolWindowControl, you can handle the OptionsChanged event:
using System.Windows.Media;
using Color = System.Drawing.Color;
using WpfColor = System.Windows.Media.Color;

namespace SimpleOptionsPagesPackage
{
    using System.Windows.Controls;

    public partial class GreetingToolWindowControl : UserControl
    {
        private readonly GreetingToolWindow _toolWindow;

        public GreetingToolWindowControl(GreetingToolWindow toolWindow)
        {
            _toolWindow = toolWindow;
            InitializeComponent();
            Loaded += (sender, args)
                => { ApplyTextSettings(); };
            GreetingsOptionsPage.OptionsChanged += (sender, args)
                => { ApplyTextSettings(); };
        }

        private void ApplyTextSettings()
        {
            var color = TextColor;
            var wpfColor = WpfColor.FromArgb(color.A, color.R, color.G, color.B);
            Welcome.Foreground = new SolidColorBrush(wpfColor);
            Welcome.FontSize = TextSize;
        }

        private OptionsPagesPackage Package => _toolWindow.Package as OptionsPagesPackage;

        private int TextSize => (Package?.GetDialogPage(typeof(GreetingsOptionsPage))
            as GreetingsOptionsPage)?.TextSize ?? 12;

        private Color TextColor => (Package?.GetDialogPage(typeof(GreetingsOptionsPage))
            as GreetingsOptionsPage)?.TextColor ?? Color.Red;
    }
}
Where We Are
In this blog post, you have learned that you can create a custom options page with Windows Forms user controls—when you need a custom UI instead of the default property grid.