Most VSPackages provide interaction opportunity to access the built-in functionality. The easiest way to access a particular function is to create a Visual Studio command that provides a link between the IDE’s menu or toolbar and the corresponding method of the package.
In this post, you will create a very simple package that adds a command to the Tools menu. When you click the menu item that represents the command, a message box confirms that the command has been invoked.
Adding a Custom Command to a Package
Create a new VSPackage, and name it WelcomeCommandPackage. If you did not remember the two key steps of this action, here is a short recap:
1. Start a new Visual Studio project. In the New Project dialog, select the Extensibility template category under Visual C# | Windows, and then choose the VSIX Project template.
2. After the IDE has created the project, in Solution Explorer, right-click the WelcomeCommandPackage project node, and add a Visual Studio Package item (WelcomeCommandPackage.cs) with the Add New Item command.
It is easy to create a new command:
Use the Add New Item command—just as you did when you added a new VSPackage to the project—, and create a new Custom Command item, as Figure 1 shows. Name the new item WelcomeCommand.cs.
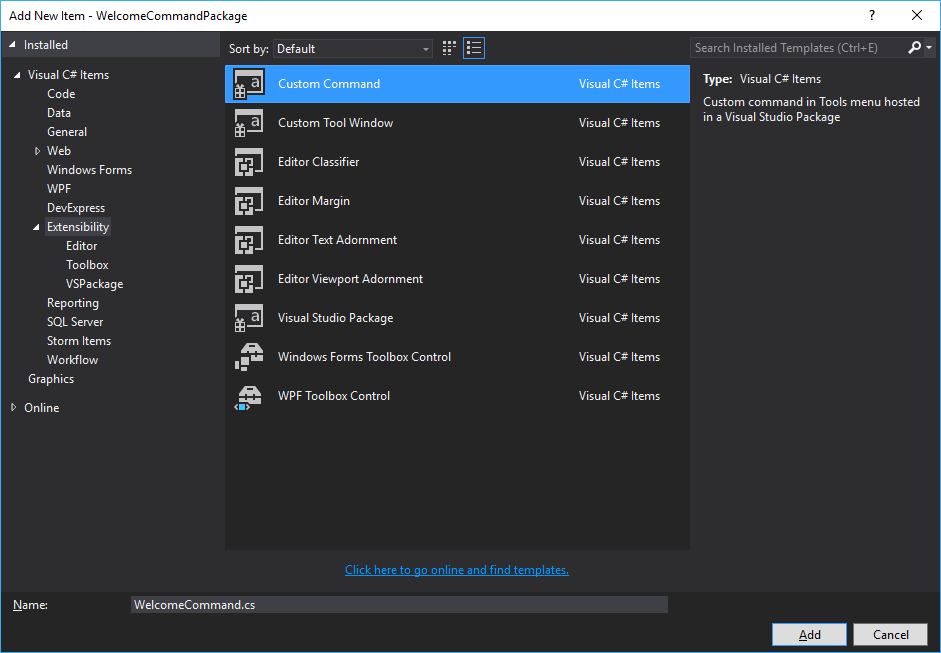
Figure 1: Adding a new Custom Command to the package
That’s all. The custom command you added to the package is integrated with the project, so you can try the VSPackage without any further code. Run the project with Ctrl+F5. When the Experimental Instance starts, you can find a new menu item in the Tools menu, as Figure 2 shows.
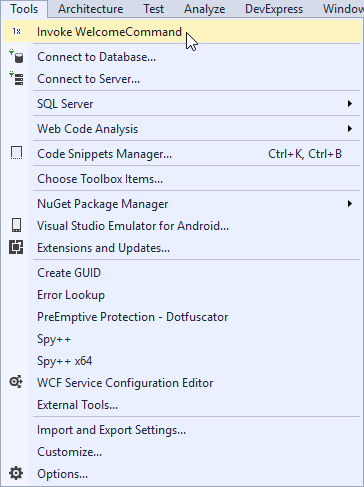
Figure 2: The menu item that represents the new custom command
When you click this menu item, the package pops up a message dialog (Figure 3).
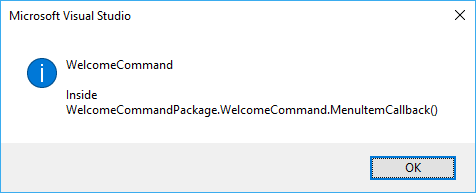
Figure 3: The message coming from the package
Inside a Custom Command
At first sight, it seems that implementing a custom command should be a very simple task: we somehow have to add a menu item to Visual Studio and create an event handler to invoke the appropriate method when this very menu item is clicked.
Well, this is exactly we have to do. However, we must do it in a way that supports the Visual Studio shell’s command infrastructure—and it makes the task a bit more complicated than it seems to be first. The shell has several tasks regarding custom commands:
- As you already learned, the shell loads the packages into the memory on-demand. In the case of the custom command we added in
WelcomeCommandPackage, this moment is when the user clicks the menu item. But wait! How can the menu item be displayed if the package is not loaded yet? - Visual Studio custom commands can be set up so that they are available from other packages, or can be invoked from the Command window.
- Depending on the function of the command, it may be enabled in a certain context and disabled in another. For example, if the command requires an open solution, it should not be invokable while there is no solution loaded.
- Commands are entirely separate concepts from the UI elements that represent them. The menu items, toolbar buttons just trigger the execution of a command. When a command cannot be executed in a particular context, the dimmed state of corresponding UI elements reflect the state of the command.
Now, let’s see what happened when you added a new custom command to the project! The wizard behind the Add New Item function created three new project files—WelcomeCommand.png, WelcomeCommand.cs, and WelcomeCommandPackage.vsct—, as Figure 4 shows.
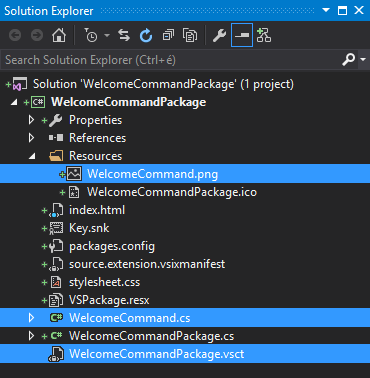
Figure 4: New project files added with the custom command
Besides these files, the wizard also changed the WelcomeCommandPackage.cs file:
[PackageRegistration(UseManagedResourcesOnly = true)]
[InstalledProductRegistration("#110", "#112", "1.0", IconResourceID = 400)]
[Guid(PackageGuidString)]
[ProvideMenuResource("Menus.ctmenu", 1)]
public sealed class WelcomeCommandPackage : Package
{
    public const string PackageGuidString = "59ba8d81-8976-4286-ab0e-fcae275b2d8c";

    public WelcomeCommandPackage()
    {
    }

    protected override void Initialize()
    {
        base.Initialize();
        WelcomeCommand.Initialize(this);
    }
}
The package now has a ProvideMenuResource attribute decoration, and in the Initialize method, it invokes WelcomeCommand.Initialize.
Menu Resources
Each package can register menu resources that define menu and toolbar items that are integrated with the shell so that the user can trigger a particular command. A VSIX project defines this information in an XML file with the .vsct extension, and the build process compiles the .vsct file into a menu resource named “Menus.ctmenu”.
The ProvideMenuResource attribute has two arguments. As you can see from the code listing above, the first argument is the name of the menu resource, namely “Menus.ctmenu”. The second argument is a version number.
At the moment you added the new custom command, the Add New Item wizard set up the VSIX project so that the WelcomeCommandPackage.vsct file compiles to the “Menus.ctmenu” resource. Both the name of the .vsct file and the resource are wired in the project file (WelcomeCommandPackage.csproj), so either renaming WelcomeCommandPackage.vsct or changing the resource name in ProvideMenuResource would prevent the menu item from appearing in the Tools menu.
If, for any reason, you need to modify them, lookup the VSCTCompile entry in the .csproj file, and alter it accordingly:
...
<VSCTCompile Include="WelcomeCommandPackage.vsct">
    <ResourceName>Menus.ctmenu</ResourceName>
</VSCTCompile>
...
Commands
Now, it is time to look at the WelcomeCommand.cs file generated by the Add New Item wizard. This file encapsulates every piece of information to declare a command:
using System;
using System.ComponentModel.Design;
using Microsoft.VisualStudio.Shell;
using Microsoft.VisualStudio.Shell.Interop;

namespace WelcomeCommandPackage
{
    internal sealed class WelcomeCommand
    {
        public const int COMMAND_ID = 0x0100;

        public static readonly Guid CommandSet = new Guid("348b27d9-756d-4d46-82de-8a15e33118ac");

        private readonly Package _package;

        private WelcomeCommand(Package package)
        {
            if (package == null)
            {
                throw new ArgumentNullException(nameof(package));
            }

            _package = package;

            var commandService = ServiceProvider.GetService(typeof(IMenuCommandService))
                as OleMenuCommandService;
            if (commandService == null) return;

            var menuCommandID = new CommandID(CommandSet, COMMAND_ID);
            var menuItem = new MenuCommand(MenuItemCallback, menuCommandID);
            commandService.AddCommand(menuItem);
        }

        public static WelcomeCommand Instance { get; private set; }

        private IServiceProvider ServiceProvider => _package;

        public static void Initialize(Package package)
        {
            Instance = new WelcomeCommand(package);
        }

        private void MenuItemCallback(object sender, EventArgs e)
        {
            var message = $"Inside {GetType().FullName}.MenuItemCallback()";
            var title = "WelcomeCommand";

            VsShellUtilities.ShowMessageBox(
                ServiceProvider,
                message,
                title,
                OLEMSGICON.OLEMSGICON_INFO,
                OLEMSGBUTTON.OLEMSGBUTTON_OK,
                OLEMSGDEFBUTTON.OLEMSGDEFBUTTON_FIRST);
        }
    }
}
Note: Please observe, I removed the generated commands and changed the syntax to C# 6.0 for the sake of conciseness. Also, I renamed a few class members to adopt to the naming conventions I use.
A command is identified with a tuple of a GUID and an integer. Accordingly, the ID of WelcomeCommand is composed of CommandSet and COMMAND_ID:
public const int COMMAND_ID = 0x0100;
public static readonly Guid CommandSet = new Guid("348b27d9-756d-4d46-82de-8a15e33118ac");
As a useful convention, we use the same GUID for commands that logically belong together, and set separate command ID within that particular GUID.
WelcomeCommand uses a kind of singleton pattern. The static Instance property of the class allows access to the command. The static Initialize method constructs the singleton instance:
private WelcomeCommand(Package package)
{
    if (package == null)
    {
        throw new ArgumentNullException(nameof(package));
    }

    _package = package;

    var commandService = ServiceProvider.GetService(typeof(IMenuCommandService))
        as OleMenuCommandService;
    if (commandService == null) return;

    var menuCommandID = new CommandID(CommandSet, COMMAND_ID);
    var menuItem = new MenuCommand(MenuItemCallback, menuCommandID);
    commandService.AddCommand(menuItem);
}
Each command needs to be hosted by a container that can manage the command, namely tell whether a particular command can be executed and invoke it when the container is requested to do so.
For custom commands, this container is an OleMenuCommandService instance that can be requested from the package through the ServiceProvider.GetService() call. The ServiceProvider property retrieves the package itself. The last part of the constructor assigns the command to the MenuItemCallback function that is executed when the command is triggered and adds this command to the OleMenuCommandService instance.
The MenuItemCallback function simply displays a message box with the help of the VsShellUtilities class:
private void MenuItemCallback(object sender, EventArgs e)
{
    var message = $"Inside {GetType().FullName}.MenuItemCallback()";
    var title = "WelcomeCommand";

    VsShellUtilities.ShowMessageBox(
        ServiceProvider,
        message,
        title,
        OLEMSGICON.OLEMSGICON_INFO,
        OLEMSGBUTTON.OLEMSGBUTTON_OK,
        OLEMSGDEFBUTTON.OLEMSGDEFBUTTON_FIRST);
}
Note: The VsShellUtilities class contains about 50 static members that help you with shell-related common tasks such as showing dialogs, checking the state of the IDE, managing documents, and much more.
The .vsct File
I still need to explain how Visual Studio displays the menu item related to the command, and how it knows that clicking that item should trigger WelcomeCommand. The missing link is the WelcomeCommandPackage.vsct file.
NOTE: When the wizard generates the .vsct (Visual Studio Command Table) file, it creates it with detailed comments that help you understand the role of a particular markup part. I deliberately removed those comments for the sake of brevity. I suggest you keep them.
This file contains three main sections:
<CommandTable>
  <Extern href="stdidcmd.h"/>
  <Extern href="vsshlids.h"/>

  <Commands package="guidWelcomeCommandPackage">
    <!-- ... -->
  </Commands>

  <Symbols>
    <!-- ... -->
  </Symbols>
</CommandTable>
The <Extern> nodes refer to C header files that contain Visual Studio shell command-related identifiers. The <Commands> section declares the structure of the triggerable items (menu and toolbar items) and the commands they trigger within the package. The <Symbols> element collects mappings between symbolic names and identifier values.
In a future post, I will explain every nitty-gritty details of the .vsct file format. Now, I give you only a brief overview. Let’s start with the <Commands> section:
<Commands package="guidWelcomeCommandPackage">
  <Groups>
    <Group guid="guidWelcomeCommandPackageCmdSet" id="MyMenuGroup" priority="0x0600">
      <Parent guid="guidSHLMainMenu" id="IDM_VS_MENU_TOOLS"/>
    </Group>
  </Groups>

  <Buttons>
    <Button guid="guidWelcomeCommandPackageCmdSet" id="WelcomeCommandId"
      priority="0x1100" type="Button">
      <Parent guid="guidWelcomeCommandPackageCmdSet" id="MyMenuGroup" />
      <Icon guid="guidImages" id="bmpPic1" />
      <Strings>
        <ButtonText>Invoke WelcomeCommand</ButtonText>
      </Strings>
    </Button>
  </Buttons>

  <Bitmaps>
    <Bitmap guid="guidImages" href="Resources\WelcomeCommand.png"
      usedList=
        "bmpPic1, bmpPic2, bmpPicSearch, bmpPicX, bmpPicArrows, bmpPicStrikethrough"/>
  </Bitmaps>
</Commands>
The package attribute of <Commands> links the nested commands to WelcomeCommandPackage—it names the GUID that identifies the package. As you will see later, the value of the guidWelcomeCommandPackage symbolic name is defined within the <Symbols> section.
Commands can be placed into the menu structure of the Visual Studio shell through command groups. The single <Group> element within <Groups> declares a logical container (identified with a guid and an id). The <Parent> element tells that this logical command group should be put into the main menu of the IDE (guid="guidSHLMainMenu"), within the Tools menu (id="IDM_VS_MENU_TOOLS").
Note: The aforementioned identifiers are declared in the vsshlids.h file that is imported with the <Extern href="vsshlids.h"/> node.
The <Buttons> section declares triggerable menu items with their visual appearance. The single command in our package goes into a menu item declared with the nested <Button> element. The <Parent> node refers to the logical container the menu item belongs to. As you see from the markup above, it is the single <Group> we placed into the Tool menu.
Menu items may have icons. Here, the <Icon> of the command is a sprite (id="bmpPic1") within a bitmap stripe (guid="guidImages"). The <Bitmaps> section declares the available bitmap resources with their sprites. As Figure 5 shows, the WelcomeCommandPackage.png bitmap stripe contains six sprites, each of them identified with the bmpPic1, bmpPic2, bmpPicSearch, bmpPicX, bmpPicArrows, and bmpPicStrikethrough indexes, respectively.
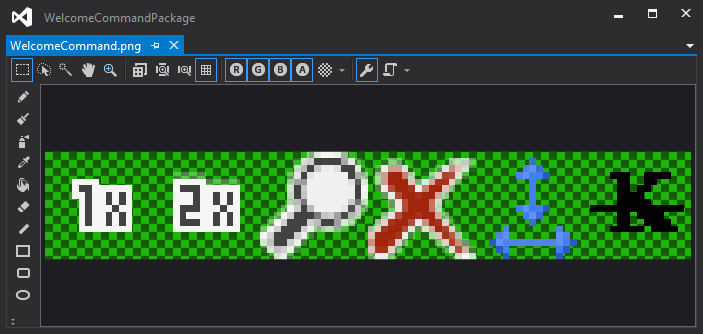
Figure 5: The WelcomeCommandPackage.png bitmap stripe
The last section of the .vsct file declares names for the GUID symbols and their nested integer IDs:
<Symbols>
  <GuidSymbol name="guidWelcomeCommandPackage"
    value="{59ba8d81-8976-4286-ab0e-fcae275b2d8c}" />

  <GuidSymbol name="guidWelcomeCommandPackageCmdSet"
    value="{348b27d9-756d-4d46-82de-8a15e33118ac}">
    <IDSymbol name="MyMenuGroup" value="0x1020" />
    <IDSymbol name="WelcomeCommandId" value="0x0100" />
  </GuidSymbol>

  <GuidSymbol name="guidImages" value="{da6c3588-9c88-4812-a389-cab403cc2350}" >
    <IDSymbol name="bmpPic1" value="1" />
    <IDSymbol name="bmpPic2" value="2" />
    <IDSymbol name="bmpPicSearch" value="3" />
    <IDSymbol name="bmpPicX" value="4" />
    <IDSymbol name="bmpPicArrows" value="5" />
    <IDSymbol name="bmpPicStrikethrough" value="6" />
  </GuidSymbol>
</Symbols>
Wherever you use a symbol name in the .vsct file, that is replaced with the corresponding value.
Putting It Together
Now, you have learned the fundamental aspects of managing custom commands in Visual Studio. Let’s summarize how they work!
You define the structure of the menus and their corresponding commands in the .vsct file. When the VSIX utility deploys the VSPackage, the menu resources declared in the package are merged with the Visual Studio menu. Even if you package is not loaded yet when the IDE starts, the items are displayed in the menus.
When the user activates a menu item, the shell checks whether the package that hosts the related command is loaded. Do not forget, commands contain the IDs of their declaring packages, and thus the IDE knows which package to check. If the package is not loaded yet, the shell loads it. With the help of its OleMenuCommandService instance, the package dispatches the command to the object can execute it.
Where We Are
You have just scratched the surface of what you can do with Visual Studio commands. In the next post, you will learn about tool windows.