In this article, you will learn that SpectNetIde provides you a straightforward way to create and run Z80 assembly programs.
To create your first Z80 assembly program, follow these steps:
- Create a new ZX Spectrum 48 project (see details here).
The
CodeFilesproject of the folder contains aCode.z80asmfile:
; Code file
start:
    .org #8000
- Extend to the code with a few lines:
; Code file
start:
    .org #8000
    ld a,2
    out (#fe),a
    jp #12a2
- In Solution Explorer, right-click the
Code.z80asmfile, and invoke the Run Z80 program command:
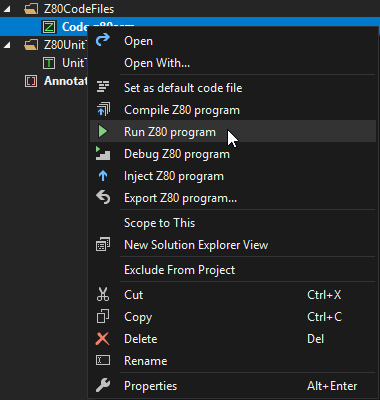
Note: You can use the Ctrl+M, Ctrl+R double shortcut keys to execute the Run Z80 program.
This command compiles the Z80 assembly code to binary machine code, starts (or restarts) the Spectrum virtual machine, injects the binary code, and runs it:
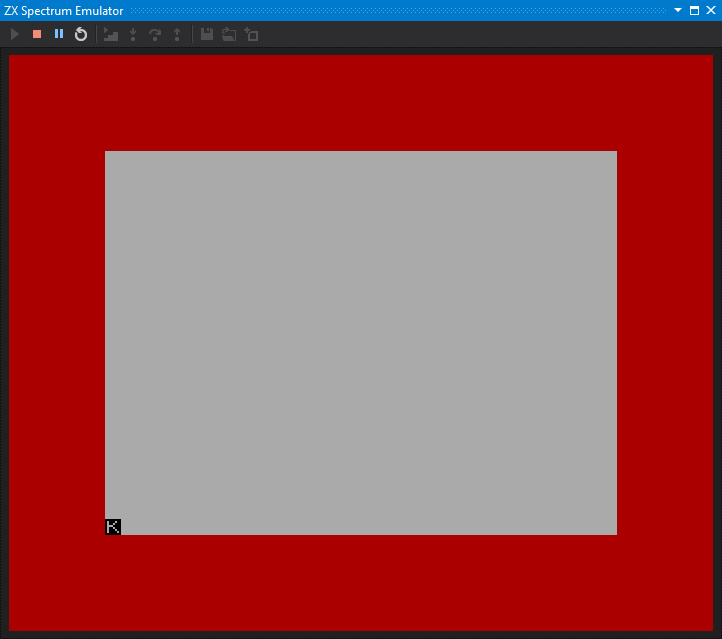
You have just created your first Z80 assembly program in SpectNetIde!
Errors in the code
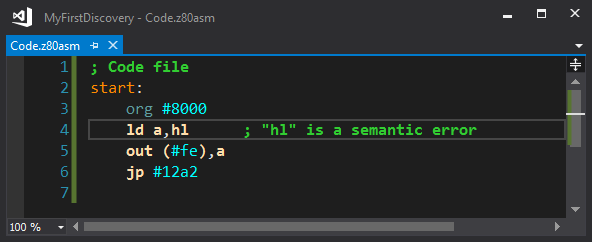
If you make an error – either syntax or semantic error – the SpectNetIDE assembler gives an error message. Let’s assume you make an error in the code:
; Code file
start:
    org #8000
    ld a,hl      ; "hl" is a semantic error
    out (#fe),a
    jp #12a2
The Z80 Assembler displays the issue in the Error List:

When you double click the error line, the IDE navigates you to the error line in the source code:
A Bit Longer Z80 Program
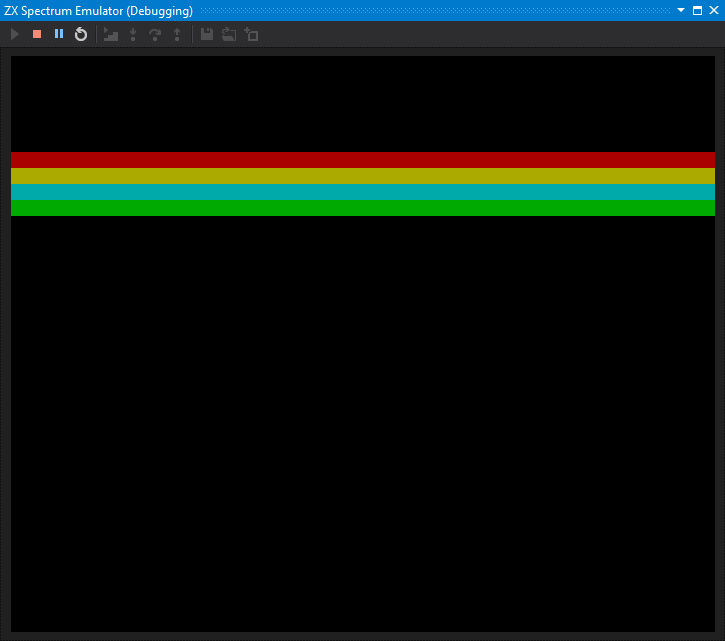
If you’re excited, you can try a bit longer Z80 code with border manipulations and delays. When you run it, the code sets the screen colors and uses the HALT statement to synchronized border drawing. When you start it, it runs until you press SPACE:
Here is the entire source code:
; Define symbols
LAST_K:		.equ #5c08
MAIN_EX:	.equ #12a2

Start:
    .org #8000

; Set Banner lines
SetScreen:
    call ClearScreen
    ld a,0b00_010_010
    ld b,0
    call ClearLine
    ld a,0b00_110_110
    ld b,1
    call ClearLine
    ld a,0b00_101_101
    ld b,2
    call ClearLine
    ld a,0b00_100_100
    ld b,3
    call ClearLine

; Set banner border area
Top:
    ld bc,#200
    call LongDelay
    ld a,2
    call SetBorder
    ld a,6
    call SetBorder
    ld a,5
    call SetBorder
    ld a,4
    call SetBorder
    ld a,0
    call SetBorder
    halt        ; Wait for the next interrupt
    ld hl,LAST_K
    ld a, (hl)	; put last keyboard press into A
    cp #20		; was "space" pressed?
    jr nz,Top	; If not, back to the cycle
    ld a,7
    call SetBorder
    jp MAIN_EX

; Sets the entire screen to black
ClearScreen:
    ld bc,24*32-1 ; #of screen attribute bytes
    ld hl,#5800 ; First attr address
    ld de,#5801 ; Next attr address
    ld (hl),0   ; Black on Black
    ldir        ; Set all attribute bytes
    ret

; A = Attr byte to set
; B = Line index
ClearLine:
    push af     ; Save A
    ld a,b      ; Multiply the line count with 32
    sla a
    sla a
    sla a
    sla a
    sla a
    ld hl,#5800 ; Calculate the attribute address
    ld d,0
    ld e,a
    add hl,de
    pop af      ; Restore A
    ld b,#20    ; Set all the 32 attribute bytes
SetAttr:
    ld (hl),a
    inc hl
    djnz SetAttr
    ret

; Sets the border color
SetBorder:
    out (#fe),a
    ld b,#86
Delay:
    djnz Delay
    ret

; Delays code execution
LongDelay:
    dec bc
    ld a,b
    or c
    jr nz,LongDelay
    ret
SpectNetIDE makes it extremely simple to reuse the Z80 assembly code, as you will learn in the next article.